Want to master the low taper fade? Our beginner-friendly guide covers everything from tools to styling, helping you achieve a flawless cut at home in 2025.
The low taper fade has become one of the most popular and versatile haircuts for men, offering a clean, polished look that works for almost any occasion. Whether you’re aiming for a professional appearance or something more casual, this haircut is a timeless choice. However, mastering the art of doing a low taper fade can seem daunting, especially for beginners.
In this detailed guide, we’ll walk you through every step of the process, from preparation to finishing touches, ensuring you achieve a flawless result. By the end of this article, you’ll have all the tools and knowledge you need to confidently create a low taper fade at home or understand exactly what to ask for at the barber.
Table of Contents
Why Choose a Low Taper Fade?
1. Versatility for Every Lifestyle
The low taper fade is incredibly versatile, making it suitable for men of all ages, face shapes, and hair textures. Whether you have straight, wavy, curly, or coily hair, this style can be tailored to suit your natural texture. It’s perfect for both formal settings and casual outings, offering a clean and modern aesthetic.
2. Subtle Yet Striking Appearance
Unlike high fades, which start higher on the head, the low taper fade begins just above the ears and gradually tapers down to the skin. This subtle transition creates a sleek and understated look that enhances facial features without being overly dramatic.
3. Low Maintenance with Proper Care
With regular trims and proper care, the low taper fade is relatively easy to maintain. Once you’ve mastered the technique, you can keep your fade looking sharp and fresh with minimal effort.
4. Celebrates Natural Hair Texture
For men with textured hair, such as curls or coils, the low taper fade provides an excellent opportunity to showcase your natural hair while keeping the sides clean and sharp.
Step-by-Step Guide to Doing a Low Taper Fade

1. Preparing for the Cut: Setting the Foundation
Before you begin, preparation is crucial to achieving a flawless result. Start by washing your hair with a lightweight shampoo and conditioner to remove dirt, oil, and product buildup. Clean hair ensures a smooth cutting process and helps you see the natural growth pattern of your hair. Once your hair is clean, dry it thoroughly using a towel or blow dryer. Avoid rubbing too aggressively, as this can cause frizz or damage. If you’re visiting a barber, communicate your vision clearly.
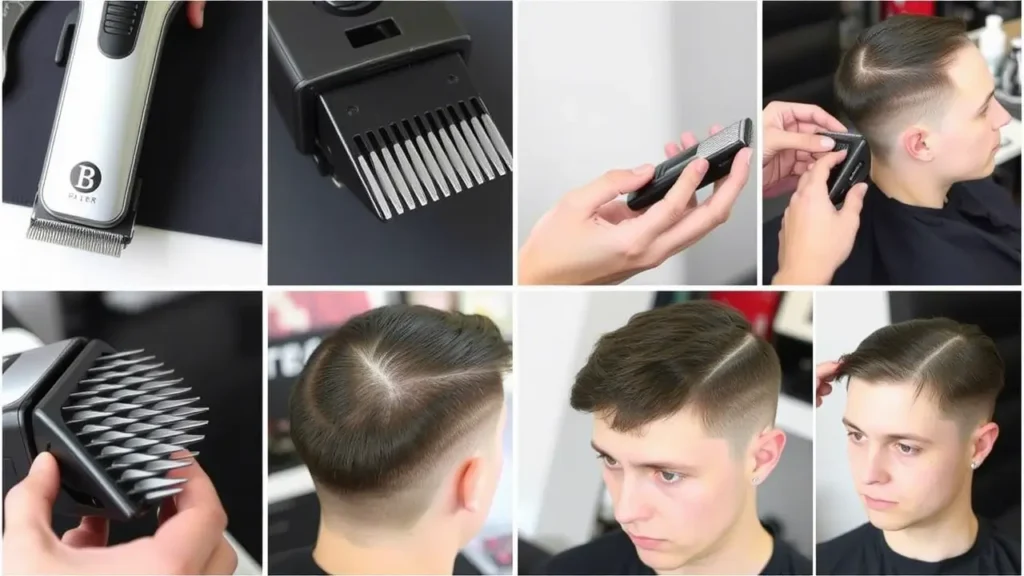
Specify that you want a low taper fade with clean lines and a slightly longer top section for versatility. If you’re doing it yourself at home, make sure you have the right tools, including clippers with adjustable guards, scissors, a fine-tooth comb, and a mirror.
2. Choosing the Right Length for the Fade: Precision Matters
For a low taper fade , the fade should start just above the ears and blend seamlessly into the skin. This subtle transition ensures the look remains clean and understated. When it comes to the top section, leave enough length (around 1-2 inches) to allow for styling versatility. This length can be slicked back for a polished appearance or tousled for a more rugged, casual vibe. If you’re aiming for a more traditional look, consider keeping the top section slightly shorter to maintain a sleek, no-nonsense appearance.
3. Sectioning the Hair: Organizing for Success
Sectioning the hair is an essential step in achieving a precise fade. Use a fine-tooth comb to divide your hair into three sections: the top, sides, and back. Secure the top section out of the way using hair clips or rubber bands. This allows you to focus on the sides and back first, ensuring a smooth and even fade.
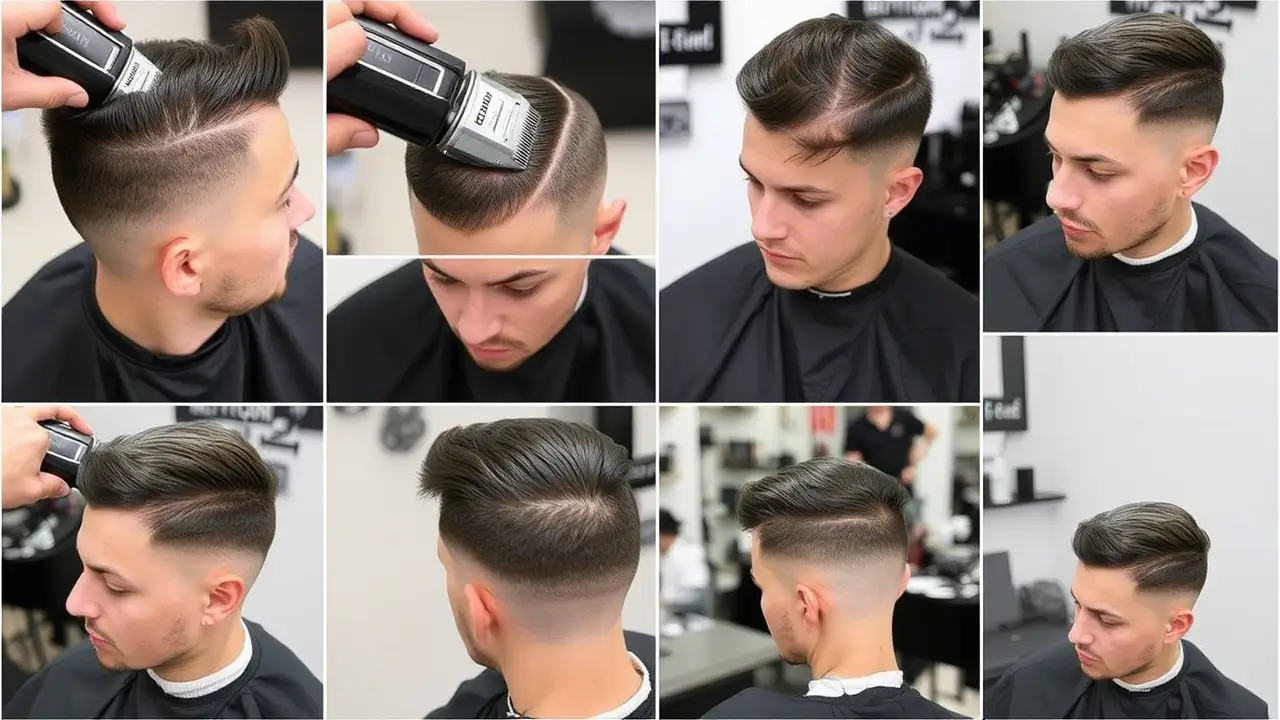
4. Starting with the Higher Guard: Building the Foundation
Begin with a higher guard on your clippers to leave some length on the sides and back. This acts as a safety net for beginners, allowing you to gradually work your way down to shorter lengths. Move the clippers upward in small, overlapping strokes to ensure an even cut. Take your time during this step, as it sets the foundation for the rest of the fade.
5. Gradually Lowering the Guard: Creating the Fade
Once you’ve used the higher guard to create the initial fade, switch to lower guard sizes (e.g., #1 or #0) as you move closer to the skin. This gradual transition is what creates the seamless gradient of a low taper fade . Be patient and methodical, ensuring each section blends smoothly into the next. Avoid rushing this step, as it’s crucial for avoiding harsh lines.
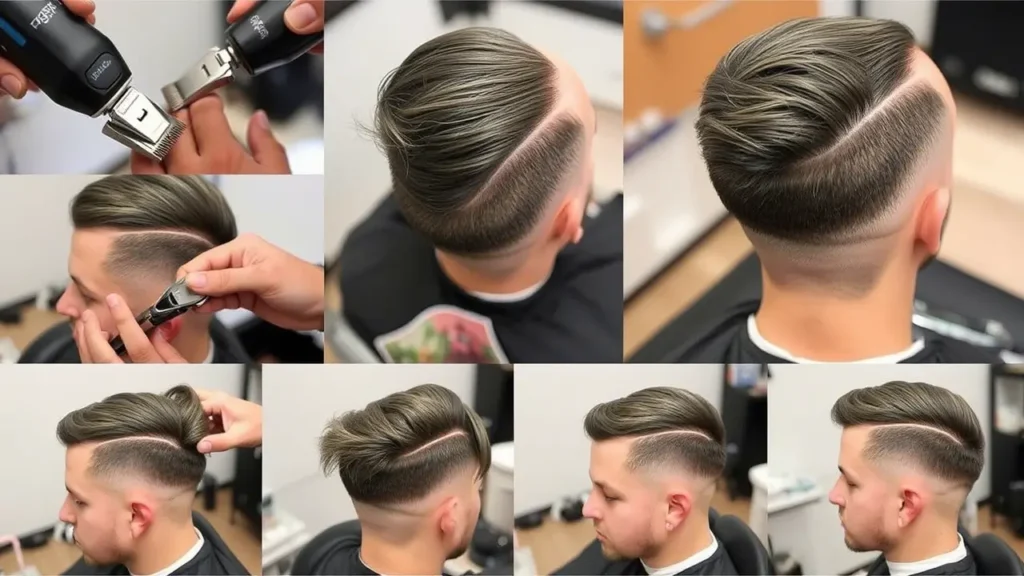
6. Blending the Transition: The Key to a Flawless Fade
Blending is arguably the most important step in achieving a flawless low taper fade . Use clippers without a guard to carefully blend the transition between the longer hair on top and the faded sides. Move the clippers upward in small, overlapping strokes to ensure a smooth gradient. Avoid rushing this step, as it’s crucial for avoiding harsh lines. If you’re doing it yourself, use a mirror to check the back and sides for consistency. For beginners, it’s always a good idea to start slow and make gradual adjustments. A well-blended fade ensures the focus remains on your sharp, disciplined appearance.
7. Cleaning Up the Edges: Perfecting the Details
Once the fade is complete, use a razor or trimmer to clean up the edges around the neckline, sideburns, and ears. This step adds a polished finish to your haircut and ensures everything looks neat and tidy. Be careful not to over-shave, as this can make the fade look unnatural.
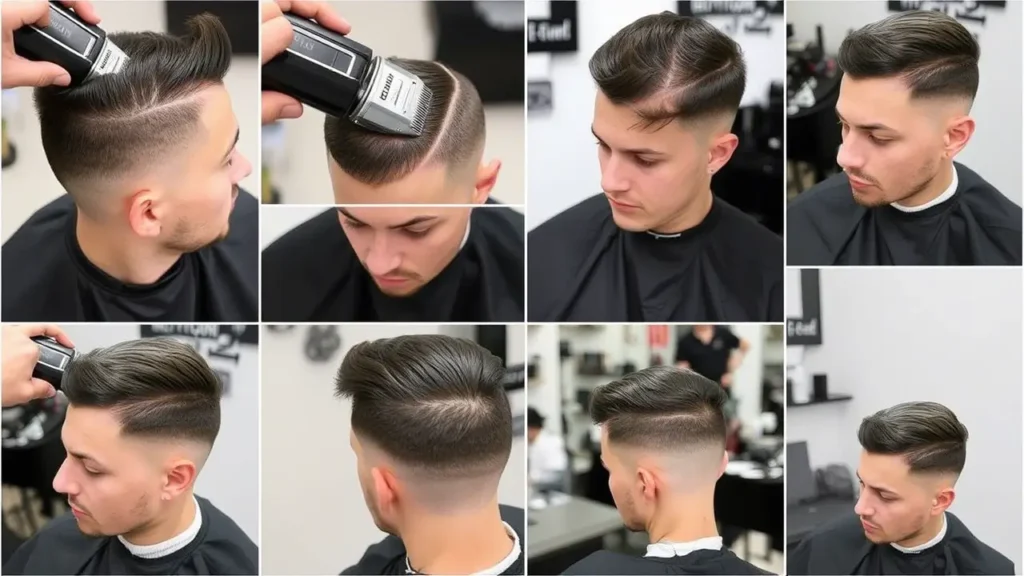
8. Styling the Top Section: Adding Personality
The top section of the hair is where you can truly express your personality and adapt the style to different scenarios. Here are three styling variations inspired by a Ninja’s lifestyle:
- Slicked-Back Style for Formal Missions:
For formal occasions or situations where you need to blend into urban environments, apply a lightweight pomade to damp hair and comb it back using a fine-tooth comb. This style exudes confidence and discipline, making it perfect for business meetings or formal gatherings. Add a neatly trimmed beard for extra refinement. - Messy Textured Look for Stealth Mode:
For a more rugged, adventurous vibe, use a texturizing spray and tousle the hair with your fingers. This look reflects a Ninja’s readiness for action and adventure. Pair it with a clean fade and optional stubble for a rugged yet approachable appearance. - Side-Swept Style for Urban Camouflage:
For a balanced appearance, part the hair to one side using a comb and apply a medium-hold pomade. This style is perfect for blending into urban environments while maintaining a disciplined and polished look.
Top Tips for Maintaining a Low Taper Fade
1. Regular Trims: Staying Sharp and Disciplined
Maintaining a low taper fade requires regular visits to your barber. Depending on how fast your hair grows, aim to visit every 2-4 weeks to keep the fade looking sharp and fresh. During these visits, your barber can also trim your beard and adjust the neckline and cheek lines to ensure everything stays neat and tidy. Regular trims prevent the fade from becoming too unruly and ensure the top section remains styled properly.
2. Moisturize Your Hair and Scalp: Hydration is Key
Both your hair and scalp require consistent moisture to stay healthy and manageable. Use a lightweight leave-in conditioner to keep your hair hydrated and healthy. For Ninjas—or anyone inspired by their lifestyle—hydration is crucial, as it keeps the hair strong and resilient. If you spend long hours outdoors, apply sunscreen or wear a hat to protect your scalp from sun exposure. Proper hydration ensures your hair remains soft, shiny, and ready for any mission.
3. Protect Your Beard: Discipline in Every Detail
If you’ve added a beard to your Ninja-inspired look, use a nourishing beard oil or balm to keep it soft and manageable. Trim it regularly to maintain a clean, disciplined appearance. A well-groomed beard not only enhances your facial features but also adds symmetry to your overall look. Apply a beard balm with SPF to shield your facial hair and skin from harmful UV rays. Proper protection ensures your scalp and skin remain healthy and free from irritation.
4. Use Heat Protection: Shielding Your Hair from Damage
If you use styling tools like blow dryers or flat irons to style your curls, always apply a heat protectant spray beforehand. Heat can cause damage and lead to split ends, especially in curly hair, which is naturally more prone to dryness. A heat protectant spray creates a barrier between your hair and the styling tool, reducing the risk of damage and keeping your curls looking healthy.
5. Edge Control: Perfecting the Details
Edge control is essential for maintaining a polished appearance. Use an edge control gel to define your hairline and edges, especially around the forehead and temples. This product helps smooth down flyaways and creates a clean, finished look. For your beard, use a beard wax or pomade to add hold and definition, ensuring it stays neat throughout the day.
Conclusion
The low taper fade is a versatile and practical choice that aligns perfectly with the disciplined, sleek nature of modern grooming. Whether you’re aiming for a sleek, polished look or something bold and rugged, this hairstyle can be tailored to suit your personality and lifestyle. With the right care, products, and styling techniques, you can maintain this haircut and adapt it to suit any occasion. So, channel your inner confidence and try out this timeless and confident look in 2025!
Also Read…
What If Ninja Got a Low Taper Fade?
Low Taper Fade with Curly Hair and Beard: The Hottest Look for Men in 2025
3 thoughts on “How to Do a Low Taper Fade: A Step-by-Step Guide for Beginners in 2025”